My favorite MacOS Sonoma feature makes connecting to another Mac a breeze

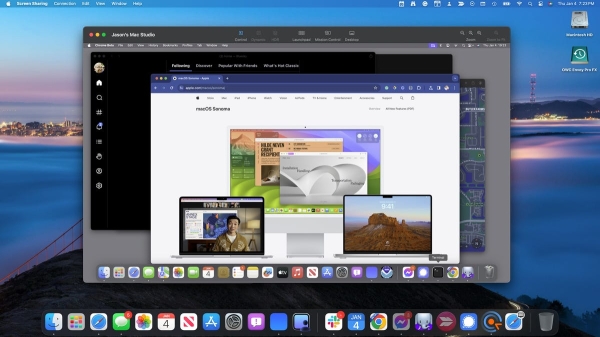
Screen Sharing on MacOS Sonoma
Jason Perlow/ZDNETHave you got an unused extra Mac lying around, perhaps an older MacBook or a desktop without a display or keyboard, known as a “headless” system? You may be a software developer looking to test applications or have a resource-intensive app you’d prefer to run on a dedicated machine instead of a VM or a container on your local Mac (or you want to run those remotely, too). Or, you might need to remotely assist another person with a Mac within your local or remote network.
Also: Buying a used Mac laptop: How to avoid scams and find the best deals
Several commercial applications are out there, like TeamViewer, which is free for personal and non-corporate use, and Edovia’s excellent VNC-based Screens For Mac, offering multi-platform integrated control, including iOS and Windows client support. However, if you want to connect to a Mac remotely from another Mac with a high-fidelity, near-local desktop-speed connection, MacOS Sonoma has you covered right out of the box with its integrated and enhanced Screen Sharing application.
Why Sonoma Screen Sharing?
MacOS has supported screen sharing via Facetime since version 12.1 with its 2021 introduction of SharePlay and has offered VNC Server support from version 10.5 in 2007. Apple’s Remote Desktop ($80) targets larger IT environments. VNC, though free and widely supported, may not deliver the fastest or highest quality remote desktop experience, particularly for graphical apps.
Also: How to add music recognition to your MacOS Menu Bar
With Sonoma’s new Screen Sharing app (version 4.1) now decoupled from Facetime, users can connect to remote Macs via VNC and a higher-fidelity connection unique to Sonoma systems. This offers closer-to-native desktop responsiveness on gigabit and faster networks, enhancing the experience for graphically intensive apps.
While effective on remote networks like WANs and VPNs, Screen Sharing is optimized for fast local networks. It performs well on high-speed Wi-Fi, especially 802.11ac Wifi6, but shows the best results on a gigabit or faster wired LAN. Consider other robust solutions like TeamViewer or Acronis Cyber Protect Connect for broader remote support needs.
Headed or headless? HDMI Dummy Plug Purchased from Amazon
Amazon.comControlling a MacBook or a desktop Mac like a Mini, Studio, or Pro is similar, but there are some differences. MacBooks are ready for remote control with their built-in peripherals, though a USB-C Ethernet adapter is recommended for a stable wired connection.
Also: I added a hardware security key to my MacBook, and it made my logins faster and safer
For Mac desktops, the initial Remote Management setup requires a monitor, mouse, and keyboard. Post-setup, consider an inexpensive HDMI “Dummy Plug” to mimic a 4K monitor connection, allowing flexible remote resolution settings without needing a permanent monitor.
Turn off sleep mode and screen saversTo set up your Mac for headless remote management, enable “Prevent automatic sleeping when the display is off” found under “Energy Saver” for desktops and “Battery” for MacBooks in System Settings.
Energy Saver dialog on Macbooks in MacOS Sonoma
Jason Perlow/ZDNETThis prevents network disconnection during sleep mode. Additionally, enable “Wake for network access” and “Start up automatically after a power failure” for consistent access, especially for unattended machines.
In the Lock Screen Settings, configure:
Start Screen Saver when inactive: Never
Turn display off when inactive: Never
Require password after screen saver begins or display is off: Based on your security needs
Lock Screen settings in MacOS Sonoma
Jason Perlow/ZDNETFor MacBooks, ensure “put hard disks to sleep when possible” is disabled when connected to power.
Configure Remote Management
To configure Remote Management on your Mac, navigate to System Settings> Remote Management and activate it. For headless setups, like on a Mac Studio, ensure you:
Enable “Always show Remote Management status in menu bar.”
Set “Anyone may request permission to control screen” to On.
Allow “VNC viewers may control screen with password” and establish a password.
Remote Managment System Settings dialog in MacOS Sonoma
Jason Perlow/ZDNETAdd users who are permitted remote access. In my case, “Jason Perlow,” the primary system administrator, and “Jason” are added to allow multiple users to simultaneously log in and share the screen. You can choose to allow all users access.
Local users permission dialog for Sharing in MacOS Sonoma
Jason Perlow/ZDNETIn the Options dialog, select the permissions remote users will have; I have enabled all permissions for comprehensive control.
Consider network security using VLANs for added protection, especially in shared spaces. For frequent access, particularly using high-speed connections, connecting the Mac to the same switch as other workstations may enhance reliability. Network reliability may vary based on specific Sonoma versions and network equipment.
Connect to the remote Mac using Screen Sharing Open the Screen Sharing app from the Sonoma system you’re connecting from. Click on “Network,” select your remote Mac, click “Connect,” and authenticate.
Authentication dialog for MacOS Sonoma Screen Sharing
Jason Perlow/ZDNETOnce connected, you can choose either a Standard or High-Performance connection.
MacOS Sonoma Screen Sharing connection dialog
Jason Perlow/ZDNETConnect to the remote Mac using Apple’s Remote Desktop application Apple’s Remote Desktop Utility
AppleApple’s $79 Remote Desktop is a long-maintained product, now at version 3.9.7. It supports high-performance connections for Macs running Sonoma, enhancing interactions with App Windows, Desktop, Launchpad, Mission Control, Keyboard, and Zoom in connection windows. Beyond simple screen sharing with the built-in tool, it offers comprehensive IT support tools, allowing you to monitor multiple Macs, transfer files, schedule tasks, generate reports on hardware and usage, and manage remote update settings.
Connect to the remote Mac using VNC Remote Ripple is a free VNC client for MacOS.
Jason Perlow/ZDNETVNC offers a straightforward remote console solution for Windows or Linux users, albeit with less fidelity than native Screen Sharing. Begin by installing a VNC client like TightlVNC (open source) or Remote Ripple. Next, configure a new connection with your remote Mac’s IP address or DNS name, and enter the password you previously established to initiate the connection.
Join the conversation: Share your Screen Sharing feedbackWhether you’re a seasoned tech aficionado or just beginning your journey, your experiences and insights are invaluable to us and the broader ZDNET community.
Have you set up your own Mac screen-sharing command center? Encountered any unique challenges or discovered handy tricks along the way? Maybe you’re still pondering which solution best fits your needs? Whatever your story, we’re eager to hear it in the comments.


Hi,
I was just browsing your website and I came up with a great plan to re-develop your website using the latest technology to generate additional revenue and beat your opponents. tdnews.co.za
I’m an excellent web developer capable of almost anything you can come up with, and my costs are affordable for nearly everyone.
I would be happy to send you “Quotes”, “Proposal” Past work Details, “Our Packages”, and “Offers”!
Thanks in advance,
Nishant (Business Development Executive)